

文档.md文件头部加入
1 | --- |
存储方式
- 七牛云
不过七牛云要报案等,好复杂,不折腾了。 - Cloudinary
打开好慢吖。 - GitHub 做图床是不错的选择。
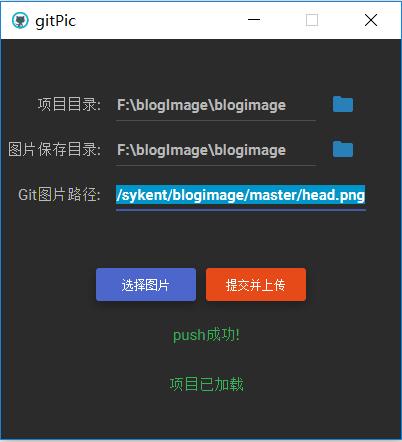
- 下载gitPic
- 创建一个public仓库,并clone到本地。
- 打开gitPic并上传图片,copy 图片链接使用,界面如下图:
hexo plantuml
安装插件1
npm install hexo-tag-plantuml --save
语法1
2
3{% plantuml %}
Bob->Alice : hello
{% endplantuml %}
实列1
2
3
4
5
6
7
8{% plantuml %}
start
:配置Java环境;
:下载pantuml.jar;
:编写描述文件;
:执行;
stop
{% endplantuml %}
markdown preview enhanced plantuml
转
hexo plantuml
只需要替换
炫酷动态背景
开启canvas-nest效果
添加修改代码next\layout_layout.swig在1
2
3
4```
{% if theme.canvas_nest %}
<script type="text/javascript" src="//cdn.bootcss.com/canvas-nest.js/1.0.0/canvas-nest.min.js"></script>
{% endif %}
主题配置文件开启canvas_nest:1
2# Canvas-nest
canvas_nest: true
音乐
博客添加音乐播放器
- 点击访问Aplayer源码GitHub Aplayer,下载到本地,解压后将
dist文件夹复制到themes\next\source文件夹下 新建
themes\next\source\dist\music.js文件,添加内容1
2
3
4
5
6
7
8
9
10
11
12
13
14
15
16
17
18
19
20
21
22
23
24
25
26
27
28
29
30
31
32
33
34
35
36
37
38
39
40
41const ap = new APlayer({
container: document.getElementById('aplayer'),
fixed: true,
loop : 'all',
order : 'list',
autoplay: false,
theme: '#e9e9e9',
audio: [
{
name: "凉凉",
artist: '张碧晨',
url: 'http://www.ytmp3.cn/down/56794.mp3',
cover: 'http://img.ytmp3.cn/image/13.jpg',
},
{
name: '沉默是金',
artist: '张国荣 ',
url: 'http://www.ytmp3.cn/down/49633.mp3',
cover: 'http://img.ytmp3.cn/image/64.jpg',
},
{
name: '风筝误',
artist: '刘珂矣',
url: 'http://up.mcyt.net/?down/46644.mp3',
cover: 'http://r1.ykimg.com/0516000059CDB501859B5D03080DE349',
}
]
});
const colorThief = new ColorThief();
const setTheme = (index) => {
if (!ap.list.audios[index].theme) {
colorThief.getColorAsync(ap.list.audios[index].cover, function (color) {
ap.theme(`rgb(${color[0]}, ${color[1]}, ${color[2]})`, index);
});
}
};
setTheme(ap.list.index);
ap.on('listswitch', (index) => {
setTheme(index);
});源码参数解析:Aplayer 中文文档
外链音乐下载:外链音乐地址- 打开
themes\next\layout\_layout.swig文件,在<body itemscope ...>添加以下源码:
*1
2
3
4<link rel="stylesheet" href="/dist/APlayer.min.css">
<div id="aplayer"></div>
<script type="text/javascript" src="/dist/APlayer.min.js"></script>
<script type="text/javascript" src="/dist/music.js"></script>
网易云音乐(没啥用,还是用上面的吧)
网易云音乐。网易云音乐->某首歌曲->生成外链播放器,在layout_macro\sidebar.swig文件,在<section></section>标下添加:
1 | <div id="music163player"> |
统计功能
字数统计
安装hexo-wordcount插件1
npm install hexo-wordcount --save
主要功能:
- 字数统计:WordCount
- 阅读时长预计:Min2Read
- 总字数统计: TotalCount
主题配置文件开启功能:1
2
3
4
5
6# Post wordcount display settings
# Dependencies: https://github.com/willin/hexo-wordcount
post_wordcount:
item_text: true
wordcount: true
min2read: true
阅读次数统计
配置LeanCloud,目的拿到AppID和AppKey配置文章阅读量统计的功能
步骤:
- leancloud注册账号
创建应用,应用名随便,进入应用–>存储–>创建Class,类名固定为
1
23. 应用-->设置-->应用key, 获取App ID、App Key
4. 打开主题配置文件, 配置App ID、App Key ,如下:leancloud_visitors:
enable: true
app_id: joaeuuc4hsqudUUwx4gIvGF6-gzGzoHsz
app_key: E9UJsJpw1omCHuS22PdSpKoh1
2
3
4
### 评论系统 valine
1. 如阅读次数统计配置LeanCloud
2. 打开主题配置文件,搜索valine 配置App ID、App Key ,如下:valine:
enable: true
appid: your app id
appkey: your app key
notify: false # mail notifier , https://github.com/xCss/Valine/wiki
verify: false # Verification code
placeholder: ヾノ≧∀≦)o来啊,快活啊!
guest_info: nick,mail,link
pageSize: 101
2
3
4
5
6
73. Leancloud -> 设置 -> 安全中心 -> Web 安全域名 把你的域名加进去
### 添加顶部加载条
1. 打开打开`/themes/next/layout/_partials/head.swig`文件,搜`maximum-scale=1`,该行下面添加以下代码:
```javascript
<script src="//cdn.bootcss.com/pace/1.0.2/pace.min.js"></script>
<link href="//cdn.bootcss.com/pace/1.0.2/themes/pink/pace-theme-flash.css" rel="stylesheet">修改进度条颜色,接着上面的添加以下代码:
1
2
3
4
5
6
7
8
9
10
11
12
13<style>
.pace .pace-progress {
background: #1E92FB; /*进度条颜色*/
height: 2px;
}
.pace .pace-progress-inner {
box-shadow: 0 0 10px #1E92FB, 0 0 5px #1E92FB; /*阴影颜色*/
}
.pace .pace-activity {
border-top-color: #1E92FB; /*上边框颜色*/
border-left-color: #1E92FB; /*左边框颜色*/
}
</style>
修改文章内链接样式
- 将链接文本设置为蓝色,鼠标划过时文字颜色加深,并显示下划线
打开/themes/next/source/css/_custom/custom.styl,添加css一下样式:1
2
3
4
5
6
7
8.post-body p a {
color: #0593d3;
border-bottom: none;
&:hover {
color: #0477ab;
text-decoration: underline;
}
}
实现点击出现桃心效果
打开
/themes/next/source/js/src, 新建love.js文件,文件内容为以下代码:1
!function(e,t,a){function r(){for(var e=0;e<n.length;e++)n[e].alpha<=0?(t.body.removeChild(n[e].el),n.splice(e,1)):(n[e].y--,n[e].scale+=.004,n[e].alpha-=.013,n[e].el.style.cssText="left:"+n[e].x+"px;top:"+n[e].y+"px;opacity:"+n[e].alpha+";transform:scale("+n[e].scale+","+n[e].scale+") rotate(45deg);background:"+n[e].color+";z-index:99999");requestAnimationFrame(r)}var n=[];e.requestAnimationFrame=e.requestAnimationFrame||e.webkitRequestAnimationFrame||e.mozRequestAnimationFrame||e.oRequestAnimationFrame||e.msRequestAnimationFrame||function(e){setTimeout(e,1e3/60)},function(e){var a=t.createElement("style");a.type="text/css";try{a.appendChild(t.createTextNode(e))}catch(t){a.styleSheet.cssText=e}t.getElementsByTagName("head")[0].appendChild(a)}(".heart{width: 10px;height: 10px;position: fixed;background: #f00;transform: rotate(45deg);-webkit-transform: rotate(45deg);-moz-transform: rotate(45deg);}.heart:after,.heart:before{content: '';width: inherit;height: inherit;background: inherit;border-radius: 50%;-webkit-border-radius: 50%;-moz-border-radius: 50%;position: fixed;}.heart:after{top: -5px;}.heart:before{left: -5px;}"),function(){var a="function"==typeof e.onclick&&e.onclick;e.onclick=function(e){a&&a(),function(e){var a=t.createElement("div");a.className="heart",n.push({el:a,x:e.clientX-5,y:e.clientY-5,scale:1,alpha:1,color:"rgb("+~~(255*Math.random())+","+~~(255*Math.random())+","+~~(255*Math.random())+")"}),t.body.appendChild(a)}(e)}}(),r()}(window,document);
打开
/themes/next/layout/_layout.swig文件, 在head标签内最后位置添加以下代码:1
2<!-- 页面点击小红心 -->
<script type="text/javascript" src="/js/src/love.js"></script>
更改内容区域宽度
NexT 对于内容的宽度的设定如下:
- 700px,当屏幕宽度 < 1600px
- 900px,当屏幕宽度 >= 1600px
- 移动设备下,宽度自适应
关于如何修改 Pisces Scheme 的宽度请参看 这个这个 Issue
解决的办法是打开source/css/_variables/custom.style文件,新增变量:
1
2$main-desktop = 1200px
$content-desktop = 900px
为文章添加结束标语
- 在
\themes\next\layout\_macro文件夹中新建passage-end-tag.swig文件,并在该文件中添加以下代码1
2
3
4
5
6<div>
{% if not is_index %}
<div style="text-align:center;color: #ccc;font-size:14px;"> ------------- End Thank For Your Reading -------------
</div>
{% endif %}
</div>
打开
\themes\next\layout\_macro\post.swig文件,在post-body后,post-footer前,添加下面内容:1
2
3
4
5<div>
{% if not is_index %}
{% include 'passage-end-tag.swig' %}
{% endif %}
</div>打开主题配置文件
_config.yml,在末尾添加:1
2
3# 文章末尾添加“本文结束”标记
passage_end_tag:
enabled: true
一页显示的条目数
站点配置文件_config.yml1
per_page: 10
一个比较好的hexo设计
代码高亮
配置主题文件ighlight_theme: night eighties
圆形头像
打开主题目录的文件/themes/next/source/css/_common/components/sidebar/sidebar-author.styl
将代码修改为:1
2
3
4
5
6
7
8
9
10
11
12
13
14
15
16
17
18
19
20
21
22
23
24
25
26
27
28
29.site-author-image {
display: block;
margin: 0 auto;
padding: $site-author-image-padding;
max-width: $site-author-image-width;
height: $site-author-image-height;
border: $site-author-image-border-width solid $site-author-image-border-color;
border-radius: 60%;
transition: 2.5s all;
}
.site-author-image:hover {
transform: rotate(360deg);
}
.site-author-name {
margin: $site-author-name-margin;
text-align: $site-author-name-align;
color: $site-author-name-color;
font-weight: $site-author-name-weight;
}
.site-description {
margin-top: $site-description-margin-top;
text-align: $site-description-align;
font-size: $site-description-font-size;
color: $site-description-color;
}
网站logo设置
- 通过网站favicon在线制作制作favicon图片,logo 最好设置为32*32
- 将logo放在next主题下的
source/images目录下 - 修改主题配置文件如下:
1
2
3favicon:
small: /images/favicon.ico
medium: /images/favicon.ico
实现fork me on github
在挑选自己喜欢的样式并复制代码到themes/next/layout/_layout.swig中<div class="headband"></div>下面,并将href标签中的链接换成自己github链接。实例代码:1
2<a href="https://github.com/sykent"><img style="position :absolute; top : 0; right : 0" width="149" height="149"
src="https://github.blog/wp-content/uploads/2008/12/forkme_right_darkblue_121621.png?resize=149%2C149" class="attachment-full size-full" alt="Fork me on GitHub" data-recalc-dims="1"></a>
学习链接
hexo 中文文档
git 使用教程
Start 最多的next主题
hexo 搭建
写作利器
一个大牛的博客
hexo 高阶教程
hexo next主题
hexo 比较全的配置
hexo 更全的配置博客